Creating a mirror image
Hello my fabulously creative friends!! Welcome back!
Have you ever had one of those days when inspiration strikes, only to be frustrated by the fact that your stamp is facing the wrong direction for your idea? I ran into that exact problem making today's project.
Not to worry, there is a way to get more milage out of your stamps by reversing the direction they stamp! Stick with me to find out how!

LDRS Creative shopping List:

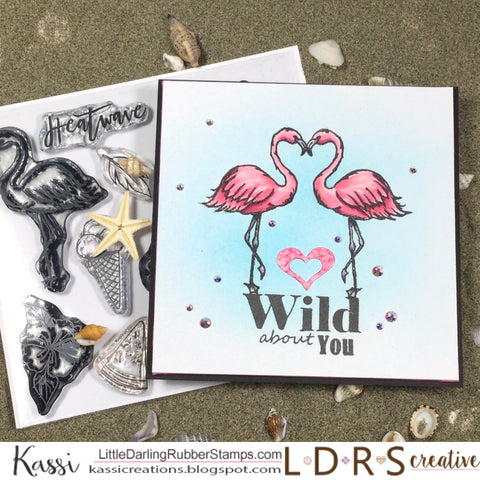
I love the flamingo from the new Heatwave stamp set... And I really wanted to do a card with 2 flamingos facing each other... the only problem is that there is only one flamingo in this set....
There are many ways to do mirror image stamping, but today I want to walk you through the way that I find the easiest way to get great results!

In addition to the stamps and ink, you'll need a small gel printing plate, a stamping press of some kind, and some acetate.
Step 1: Stick the gel plate to the inside of the stamp press lid (where you usually put your stamps. This will, in effect, become your stamp.)

Step 2: Create a reference image... Because mirror image stamping requires you to stamp twice (once onto your 'mirroring surface', then onto your paper) it's nice to have a reference so you know your image is being stamped exactly where you want it. To do this, simply stamp your flamingo onto your acetate using the LDRS Creative hybrid ink. These hybrid inks work great on slick surfaces like acetate.. just remember to heat set so it won't smear when you touch it!

Step 3: Place your cardstock in your stamp press where you want it, and close the lid. Figure out where you want your flamingo to be stamped and tape your reference image to the outside of the lid.

Step 4: Open your stamp press up again, and ink up your stamp with Raven Hybrid ink. Lightly stamp onto the gel plate using your reference image as a guide.

Step 5: Close the stamp press and press down to transfer the ink to the paper.
These hybrid inks stay wet on the gel plate long enough to create a good impression, making them the perfect choice for inks when doing this technique!
Be sure to wipe off your plate with a damp cloth immediately after stamping to avoid staining.

Step 6: Mirror image impressions are rarely PERFECT, and usually slightly lighter than if you had stamped directly with a stamp... that's just how it is. You can easily fix this by tracing over any of the lighter areas with a fine liner. (just make sure your pen is safe for whatever medium you want to color in!)

After stamping my mirror image flamingo, I went ahead and stamped the second flamingo as usual... Side by side they look great!
I struggled with mirror image stamping until I combined the gel plate with the LDRS Creative Hybrid inks.... now it's easy to get great results!
Tip: This is also a great way to create a reflection in water... For example, if I wanted my flamingo standing in water, I could do the mirror image stamping with the bird upside down, then stamp my flamingo right side up where the toes touch.. Now it looks like your flamingo is standing in water!

I really wanted to keep things simple so the focus stays on these two birds... so I masked the birds using some Stamping Mask Paper and added a bit of blue ink to the background.
Tip: Normally to create a mask, you stamp on the matte side of the mask paper... to create the mirror image mask, simply stamp on the glossy side (the back of the release paper). When you cut it out, the mask part will be the reverse image.

Aren't these two an adorable couple?!?

After the card was all put together, I felt it was still missing something... So I die cut a heart from Yupo paper using one of the hearts in the Scalloped Rectangle set. I colored it by dabbing my alcohol marker onto it.. Because Yupo is a non-porous surface, the ink just sits on top, and the more you dab, the more of this amazing marbled texture you get. It was the perfect way to tie the whole card together!
For extra tips on and tricks I used in this card, be sure to visit my blog.
If you give this technique a try using LDRS Creative products, be sure to share with us in our Facebook group! We LOVE seeing what our customers create!
If you are in need of some fabulous supplies, be sure to check out the LDRS Creative site.
For more inspiration, visit us on Pinterest, Youtube, and Instagram, and be sure to check back here daily!
Happy stamping!
See you soon!


Your flamingo card is so adorable! Thank you for sharing how to mirror a image.
Leave a comment