Creativation - Explosion Box
Hi everyone! It's Jeannie here today to share a sweet sneak peek projectsusing some of the LDRS Creative's Creativation products. Everyone should be really excited because all these items are amazing as well as perfect for invitations and celebrations.
I'm using the Sweet Sensations double sided paper in both the 12x12 and the 6x6 sizes. I love the fact that these are double sided! It actually makes it perfect for this project.

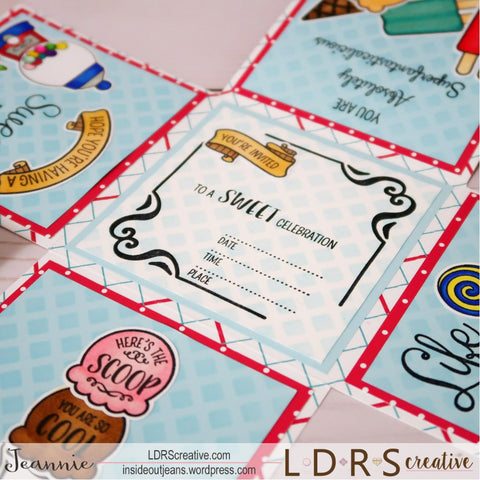
We need to assemble the explosion box. Let's start with the main component, the part that "explodes". I grabbed a piece of 12x12 paper and scored it at 4" on each side, creating a tic tac toe grid. I'll trim each corner of the paper and it leaves a "+". The "+" is the main part of the box. Once the top is pulled off, all four sides will fall down, essentially "exploding".

Each of the pieces I trimmed out, I'll be trimming it down by .25" so the square will be 3.75" x 3.75". We will be using the other side of it (red polka dots). I'll adhere it to all the four sides of the "+". I also trimmed out an additional piece of 3.75" x 3.75" light blue cardstock for the middle. Originally, I had a piece of white cardstock but I changed my mind.

I decided to use a matching piece of light blue cardstock to match the pattern's blue lines which will go on top of the red patterned squares. These squares are measured at 3.5" x 3.5". To add a little interest to it, I'm using the Little Baby Blue hybrid ink lightly with the new Waffle stencil.
I stamped out from the new sets: Ice Cream Party, Party Time, Wordalicious, Life is Sweet, and Goody Gumdrops. I used Spectrum Noir Illustrator markers to color all these images.

All these sets are so perfect for parties. I decided to pull them all together to create a fancy invite. They work so perfectly.

Once I adhere everything together, the inside is complete. Now we just have to create the top of the box.
I used the matching patterned paper from the 6x6 set and scored each side at 15/16". This allows the top to be large enough to close nicely on top of the box. However, we'll only trim down one side of the corner squares so we can use them as tabs to adhere to the sides to create the top.

I love how this project came together. It's such a cute and fun surprise for a recipient to receive and it's pretty easy to get put together once you get all the pieces together.
The box will look like this when it's complete. You can chose to tie it up or decorate it further. Here I chose to let the pattern paper show through and kept it very simple.

Once you lift the top off, the box will explode and it'll open to lay flat. The layers we added give the sides additional weight so it will lay flat.

The middle portion of the box is perfect to customize your invite with all the details for the party.
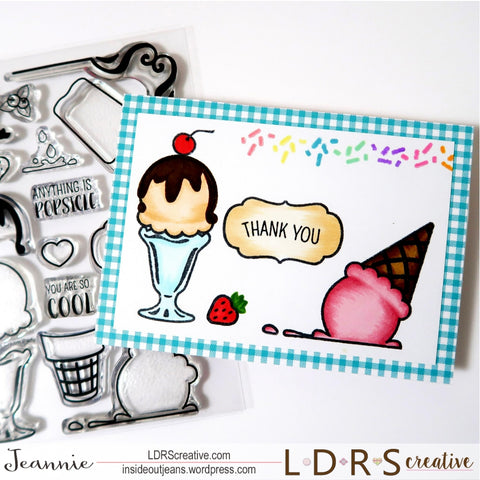
Additionally, I compiled together two thank you cards as well!
One of them is really simple because I used one of the pieces of patterned paper from the Sweet Sensations 6x6 paper pad. It has such an adorable scene with a little booth. I used one of the Party Time stamp set to stamp out the frame and add the Thank You sentiment.

For the second thank you card, I used the Ice Cream Party stamp set to stamp out a little sweet scene on a 4 bar card panel. I again used the Party Time stamp set for the Thank You sentiment. I trimmed down the stamped panel by .25" and matted it on a piece of patterned paper from the Sweet Sensations 6x6 paper pad.
Thanks for stopping by today for an extra long post but I think it really showcases a lot of the new products. I hope you enjoyed it and I can't wait for you all to play with the new products as well.


The cutting measurement for the top does not make sense
Really cool!
Leave a comment